Shopify : Use Native Product Card
This guide outlines the integration of Shopify's card-product.liquid template into Klevu Search, Category Merchandising, and Recommendations. One of the use cases is to accurately display B2B prices within these features.
The concept is simple; Use a placeholder within the Klevu result Template JS and populate it with the markup from the native card-product.liquid file within the Shopify theme.
The following example is for guidance only, you will want to adapt the code as necessary to fit your theme and strategy, but it is based on the Dawn Theme.
Create a new product liquid file within Templates for this use.
This is a common step for Klevu Search, Category Merchandising, and Recommendations. The name of the file will be used in the Klevu result rendering function to fetch the card-product.liquid template via the use of Shopify’s ability to render alternate templates via a URL parameter. Specifically, Shopify allows you to call a product’s URL with a different template other than the one that is assigned to it. For example, a product might have the default product template assigned to it, but we want to use this new template we will create one instead. So within Edit Code and the list of Templates, let's create a new Template by clicking add a new template. Choose product from the Template Type dropdown, select Liquid, and let’s call this new template klevu-template. This will create a new template for us to use.
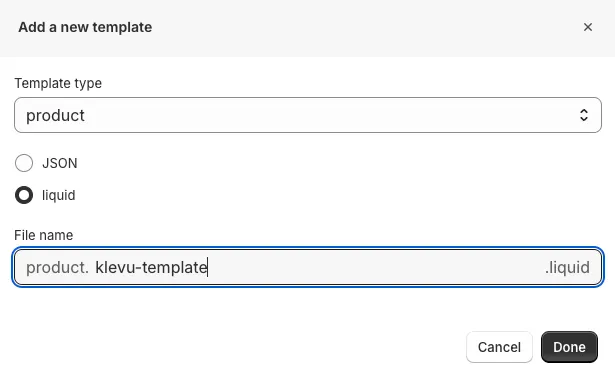
In this file, we are simply referencing the current card-product-card liquid file e.g.
{% comment %}
Klevu added for template fetch
{% endcomment %}

{%- layout none -%}

{% render 'card-product', card_product: product %}
Use layout none to omit extraneous template data and keep it to the product card markup only.
You will want to adhere to your current theme’s card-product template name as well as any required data objects to be passed (e.g. for showing the secondary image you will pass show_secondary_image: true).
Once this action is completed, below are further steps based on the solution you want to implement.
Klevu Search & Category Merchandising
Below are the steps to implement the product native tile on Search & Category Merchandising:
Create the override script file within Snippets.
Similar to the instructions described above when creating a template, this time we will go to the Snippets section and click add new snippet to create the snippet. The name of the file will be used to include the script in the core Klevu flow where necessary
e.g.
Snippets > klevu-customizations.liquid
There are five elements to this file:
- Include the default card-product CSS from the Dawn theme
- setTemplate override to assign our new productBlock placeholder
- afterTemplateRender to fetch the data from the new product.klevu-template.liquid created above
- template/klevu script block for the new productBlock placeholder
- <style> block for any fine-tuning based on your current theme CSS
Please reference the comments in the code example below for details on the functional steps.
The following example is for guidance only, you will want to adapt the code as necessary to fit your theme and strategy.
e.g.
{% comment %}
  Klevu added for template fetch
{% endcomment %}

<!-- We need to include the default product card styles -->
{{ 'component-card.css' | asset_url | stylesheet_tag }}

<!-- trigger the action after template render -->
<script>
  /* Assign new templates to Klevu Options (for automated integration) */
  if (typeof klevuSettings === 'undefined') {
    var klevuSettings = {};
  }
  klevuSettings.theme ??= {};
  klevuSettings.theme.setTemplates ??= {};
  klevuSettings.theme.setTemplates.myCustomProductBlock = {
    selector: '#myCustom_klevuLandingTemplateProductBlock',
    scope: 'landing,catnav',
    name: 'productBlock'
  }
</script>

<script type="text/javascript">
/* Assign new templates to Klevu Options (uncomment for manual integration)
klevu({
	theme: {
		setTemplates: {
            myCustomProductBlock: {
				scope: 'landing,catnav', // impacted scope
				selector: '#myCustom_klevuLandingTemplateProductBlock', // new markup block ID
				name: 'productBlock' // template placement name
			}
		}
	}
}); */
</script>

<!-- trigger the action after template render -->
<script>
    document.addEventListener('DOMContentLoaded', function () {

      klevu.afterTemplateRender('landing,catnav', async function (data, scope) {
        try {

            /* GET all the product IDs in the response */
            var productIds = data.template.query.productList.result;

            /* LOOP through the IDs */
            await Promise.all(productIds.map(async (prod) => {
                try {

                    /* FETCH the product template from Shopify API */
                    var res = await fetch(prod.url + '?view=klevu-template&variant=' + prod.id);
                    var templateBlock = await res.text();

                    /* INSERT the template markup into the placeholder */
                    var productCardHolder = document.querySelector('[data-id="' + prod.id + '"] div.kuProdWrapHolder');
                    if (res.ok) {
                        productCardHolder.innerHTML = templateBlock;
                    } else {
                        productCardHolder.remove();
                    }
                } catch (err) {
                    console.log('Not able to process this product because:', err, prod);
                }
            }));

            document.querySelectorAll('.klevuLanding .div.kuResults ul li.klevuProduct').forEach(e => {
                if (!e.textContent.trim() && e.hasChildNodes()) {
                    e.remove();
                }
            });

        } catch (err) {
            /* If we have any issues processing the above code let's log the error */
            console.log('Not able to process this product because:' + err, prod);
        }
      });
   });
</script>

<!-- productBlock override with placeholder -->
<script type="template/klevu" id="myCustom_klevuLandingTemplateProductBlock">
    <li ku-product-block class="klevuProduct klevuProductClick kuTrackRecentView grid__item" data-id="<%=dataLocal.id%>">
        <div class="kuProdWrapHolder">
          <!-- INSERT HERE product.klevu-template.liquid for <%=dataLocal.id%>  -->
        </div>
    </li>
</script>

<!-- adjust for styling as needed -->
<style>
  .kuSearchResultsPageContainer .kuResults ul li {
    width: 25%;
    padding: 0px;
    float: none;
  }
</style>
Include the script file into the Klevu core flow.
This may vary depending on how you have integrated Klevu. We would recommend to put file in Layout > theme.liquid before head closing tag.
Place the render include below the Klevu core and configurations section
e.g.
<!-- theme.liquid code before head closing tag -->
{% render 'klevu-customizations' %}
  </head>
Klevu Recommendations
Below are the steps to implement the product native tile on Klevu Recommendations:
Create a new template for the Recommendations in the KMC.
To create a new template in the KMC you will need to go to Recommendations > Templates and click ‘New Template’.
To show the products using the same look & feel as the current Shopify theme we need to create a new template that has the same fundamental elements from the existing template. This may mean that a lot of the elements from the existing related products or featured products liquid templates will need to be taken. Whilst we are aiming to achieve the same look & feel of the existing template we also want to make sure we are capturing the necessary analytics using the Klevu classes from the original template.
The following example is for guidance only, you will want to adapt the code as necessary to fit your theme and strategy.
<% var metadata = data.metadata; var logic = (metadata.logic) ? metadata.logic : ""; var pageType = (metadata.pageType) ? metadata.pageType : ""; var recsKey = (metadata.recsKey) ? metadata.recsKey : ""; var title = (metadata.title) ? metadata.title : ""; %>
<div class="kuRECSContainer" data-logic="<%= logic %>" data-recskey="<%= recsKey %>" data-page-type="<%= pageType %>">
  <% var recommendationItemList = klevu.getObjectPath(data,"query.klevuRECSItemList.result");%>
  <% if(recommendationItemList && recommendationItemList.length) { %>
    <product-recommendations class="related-products page-width isolate">
      <h2 class="related-products__heading inline-richtext h2" title="<%= klevu.dom.helpers.escapeHTML(title) %>">
        <%= title %>
      </h2>
      <ul class="grid product-grid grid--4-col-desktop grid--2-col-tablet-down" role="list">
        <% helper.each(recommendationItemList, function(key, item){ %>
          <li class="grid__item">
            <div class="kuRECS-itemWrap kuRECSItem kuRECS-item" data-id="<%= item.id %>">
            </div>
          </li>
        <% }); %>
      </ul>
    </product-recommendations>
  <% } %>
</div>
In the above example you can see:
- We have kept the fundamental Klevu functionality to get the correct page.
- We have kept the fundamental Klevu functionality to get the recommendations list.
- We have kept the fundamental Klevu classes for the elements to make sure we are tracking all analytical data.
- We have inputted the classes from the theme to make the recommendations have the same look & feel as those in the theme.
Create the post-render script.
Here we are creating a script to render the product card for each of the products that are part of the recommendation block being created. We are referencing the function found here.
The following example is for guidance only, you will want to adapt the code as necessary to fit your theme and strategy.
e.g.
<!-- We need to include the default product card styles -->
{{ 'component-card.css' | asset_url | stylesheet_tag }}

<script>
  /* Klevu runs this function once the recommendations block has been rendered */
  function klevu_bindRECSTemplateElementEvents(templateData, recsKey) {
    /* Gets an array of the products in the recommendations block */
    var productIds = templateData.query.klevuRECSItemList.result;

    /* LOOP through the IDs */
    klevu.each(productIds, async function (pkey, prod) {

      /* FETCH the product template from Shopify API */
      var res = await fetch(prod.url + '?view=klevu-template&variant=' + prod.id);
      var templateBlock = await res.text();

      /* INSERT the template markup into the placeholder */
      var productCardTarget = document.querySelector('[data-recskey="' + recsKey + '"]');
      var productCardHolder = productCardTarget.querySelector('div.kuRECSItem[data-id="' + prod.id + '"]');
      if (res.ok) {
        productCardHolder.innerHTML = templateBlock;
      } else {
        productCardHolder.remove();
      }
    });
  }
</script>
Here you can see that we are checking for the specific recommendation product ID and inputting the code block for this product in the div related to that product.
Drop the code into the desired template.
Once you have done this you are free to create a new recommendation block, assign the new template you have created, and get the code that is spat out as a result.
You can use this code to set up recommendations using the steps given in the section Smart Recommendations of the guide.
Another option is to handle it manually.
e.g.
<div class="klevu-recs" id="k-XXXXXXXX-XXXX-XXXX-XXXX-XXXXXXXXXXX"></div>You can drop this into a custom liquid block on the page you’d like to show the recommendations e.g. the home page, product page, or category page.
You may need to make some CSS changes to the custom liquid block to show certain elements correctly.
Known Caveats
When utilizing this method, it's important to note a couple of considerations:
- If prices differ from what was synchronized with the Klevu backend (such as in a Shopify B2B system), it may affect the functionality of the price facet and sort by options on search/category pages. It will not impact the Recommendation though.
- The load more feature (infinite scrolling) might not be compatible with the aforementioned approach.